Following on from our control handle, we now have to connect it to our aeroplane. As you might imagine, there are many and varied ways of doing this. There are also many different materials we can use.
When I started in this hobby, most of the models flown in this country were small and fairly light. This meant that we could use various types of thread. My favourite for models with motors up to about 1.5cc was button thread. At that time, this was entirely made of cotton and was excellent. Modern equivalents contain lots of polyester and stretch far too much, giving a very soft control.
Larger models to about 3.5cc were flown on carpet thread. This needed care as it would fray easily and break without warning. I don't believe that there is anything around today that can replace it.
Larger models were flown on 'Laystrate', available in light and heavy sizes. Light Laystrate was a 3 strand steel cable of about .012" (12 thou) diameter. It was tinned with solder, which made it easy to make up end connections by soldering. I never got around to using Heavy Laystrate, but I believe it was 7 strand of about .018" (18 thou) diameter.
Also available in those days was single strand steel wire (known as 'solid' for obvious reasons) of .006" (6 thou) and .011" (11 thou) diameter. Most people avoided this because it needed very careful handling and the general consensus was, "use it once and throw it away".
Solid lines are still used today for some specialist uses. For that reason they are outside the scope of this article, but we will return to them later in the series.
As you might imagine, in subsequent years things got more complicated (sometimes known as 'High Tech'). In general, most usage settled down to using steel line of 5 or 7 strand (usually stainless steel) in 4 diameters: .008", .012", .015" and .018" (8, 12, 15 and 18 thou).
These sizes came about from competition rules involving various engine sizes. These originated in the USA and were generally adopted throughout the world. Later international rules were developed which specified slightly different sizes for specific classes, but the above sizes became general for most flying because they were generally available, albeit mainly from the US.
There is one other type generally available today known as 'fishing trace'. This is a stranded steel line with a nylon covering, available in various sizes categorised by breaking strength. To date, the writer has no experience of this, but intends to remedy this situation and report further.
The rule of thumb here is to use the longest line length that the model can cope with. Short lines can be very tiring! Specific competition classes will tell you what line length to use. Where no length is specified, a maximum length of 70 feet applies, this being from the centre of the handle to the centre line of the model.
As a general rule, try the following:
| Engine Size | Line Length | Line Diameter |
|---|---|---|
| Up to 1cc (0.06 cu in) | 30 - 40 feet | 0.008" |
| 1 to 1.5cc (0.06 - 0.09 cu in) | 40 - 50 feet | 0.008" |
| 1.5 to 2.5cc (0.09 - 0.15 cu in) | 50 - 60 feet | 0.008" |
| 2.5 to 3.5cc (0.15 - 0.21 cu in) | 50 - 60 feet | 0.012" |
| 3.5 to 5cc (0.21 - 0.30 cu in) | 55 - 65 feet | 0.012" |
| 5cc to 6.5cc (0.30 - 0.40 cu in) | 55 - 65 feet | 0.015" |
| 6.5 to 10cc (0.40 - 0.61 cu in) | 60 - 70 feet | 0.018" |
There used to be an SMAE general control-line rules requirement that specified line diameters of .010" for up to 2.5cc, .012" up to 6.5cc and .018" for over 6.5cc. These rules are almost certainly still in force, but do not appear in the current BMFA rules, simply because there are no general rules given. It would be an excellent idea to reinstate and reinforce them on safety grounds alone, but certain factions are against this.
For contest purposes, a pull test of the lines, model and handle are required, but this is rarely enforced.
There are many ways of making up the end connections. The basic requirement is some kind of loop at each end of each line. Mention has already been made of soft soldering loops with certain types of wire. At least one type of wire is available which is brass plated to facilitate this. While this can be satisfactory, care in handling is necessary, with regular inspections, because of the weakness created at the end of the joint. With the commonly used stainless steel line, this is not possible and some other method must be used.
With larger models, it is very desirable to use some form of eyelet, or small bobbin, to strengthen the line around the loop itself. Stranded line does not take kindly to being sharply bent back on itself and can kink, particularly when a load is applied to the bend. Chaffing can also cause weakness at this point.
A useful material here is heatshrink tubing, which is available in many sizes and colours. If nothing else is available it can be used around the loop in place of an eyelet. It can also be used to seal any twisted, or wrapped joint at the end of the line. By using two, or more, sizes of tubing a very neat and secure joint can be made.
Ready made up lines in various sizes are available from the USA. These usually employ eyelets at the end loops and secure the wire by crimping inside a copper or aluminium (maybe that should be aluminum) tube. Kits to make up your own lines are available complete with the eyelets and tubing. I have used this system, both in ready made and kit form, and have never had a problem (where's that piece of wood?) but I simply don't like it. It seems to be placing an awful lot of trust in the security of a crimp, even if properly done. Don't even think about dissimilar metals and electrolytic action.
 Commercial crimped ends - which I don't like!
The system of making end connections that I have used for many years is based on the method recommended by the Academy of Model Aeronautics (AMA) and has been published many times and is to be found on many model plans published in America. See Fig.1.
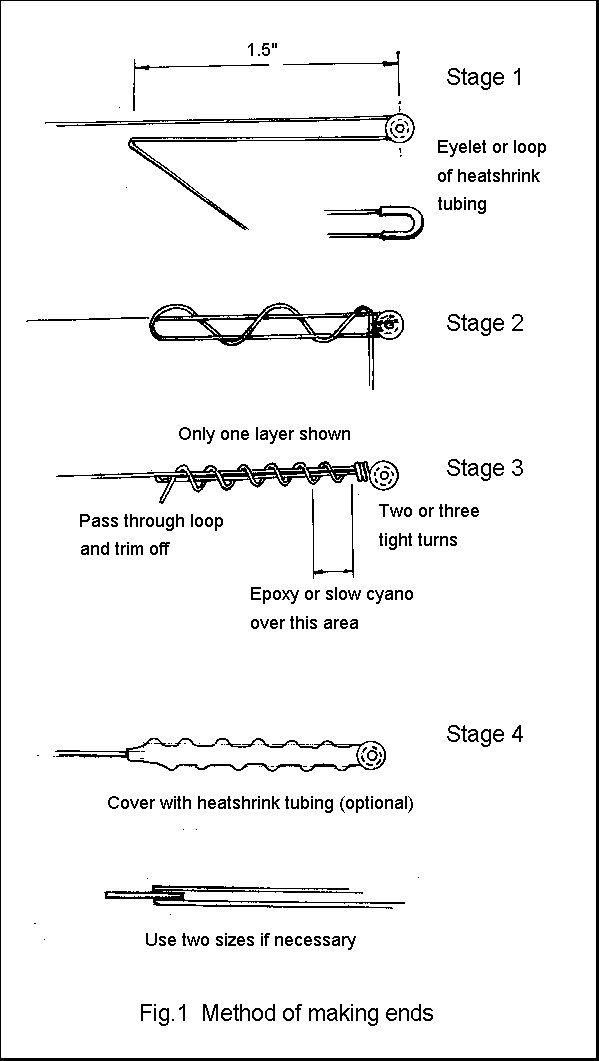
Basically, you wrap the line around your eyelet (or make a loop covered with heatshrink) and bend the end back along your line for about one and a half inches. You then bend the line back on itself, not too sharply, and wrap the line around itself two or three times until you arrive back at the eyelet. Then wind three or four turns as tightly as possible to enclose the eyelet. Finally, wrap the line fairly tightly until you arrive back at the end of the doubled back line and push the end through the loop. Cut off the excess line ensuring that the end is long enough to stop it popping back through the loop.
If you have followed that, finish off with a small amount of epoxy, or slow cyano, adjacent to the eyelet to lock the whole thing and stop the line slipping. Some people wrap this part with thread and then glue. Keep this piece fairly short so that most of the assembly remains flexible. Any solid area here will produce a weakness where it ends.
You can leave things at that if you prefer, but a covering of heatshrink tube makes things neater and snugger. You may find it difficult to get exactly the size of tube that you need to cover the wrapped section, but use a piece of small diameter on the plain line first. You can then use a fairly large diameter piece to cover the whole thing.
 Line ends made with eyelets.
If you prefer, you can add the epoxy just before sliding the heatshrink tube over the assembly and immediately shrink with a heat gun or soldering iron. This helps the epoxy to wick into the joint and makes it set quickly. Note that a soldering iron will not burn heatshrink tubing, though a dirty iron will discolour it.
It is fairly important to make both lines the same length and I normally make up one end of each line and then go along to my flying field to complete things. I anchor the made up ends by pushing a long screwdriver into the ground and then measure out the length I need and make a bend in the lines where the other end is to be. It's important that you pull the lines fairly tight before doing this. Otherwise, you will be surprised how much difference there can be in the finished article. I then go home and make/finish off the other ends. Don't forget to add all the necessary bits of tubing before you do this.
Before you actually use the lines it is a good idea to lay them out on the ground, separately, and give each line a good tug. This settles any possible movement in the ends and stabilises the lines themselves. The first time that stranded lines are put under tension, they can rotate to a fair degree. This should be repeated at regular intervals.
Some stranded line will show a tendency, after some use, to wrap around itself and the lines may even jam together. Investigation reveals that each individual line is not twisted, yet they persist in wrapping around each other. The above method of separating and pulling helps a lot, but the usual culprit lies in the use of solid wire leadouts on the model (more next time) which vibrate and transmit this vibration to the lines. A cure can be effected by adding a short flexible link between the lines and the leadouts. A 2" loop of stout thread does the trick. I am indebted to Barry Wade for this idea.
The main rule here is: store them on the largest diameter reel that you can find, or easily handle. I have seem pram wheels used to great effect, also those plastic wheels found in some DIY stores. A large metal can makes an excellent reel and can carry several sets of lines.
Commercial line sets tend to come on plastic reels of about 4" o/dia x 1/2" wide. This should be regarded as an absolute minimum. Larger reels of around 5" dia x 1" wide used to be available, but have been discontinued by the original manufacturer. I believe that these have since been reintroduced from another source.
Most commercial reels include some means of attaching the line to the reel, usually in the form of a slot in the rim. This method needs care in use and I prefer to add an 8BA (2M) bolt which accepts the eyelets comfortably. The usual intention is that the same method is used to retain the outer end, but a rubber band around the reel is better.
 Added line anchorage inside large reel.
Regular inspections are essential. If you find any kinks, throw them away - it's much cheaper. One exception here is if the kink is close to the end and the length is not crucial, when you can simply shorten the lines and remake the ends. However, unless there is a good reason for that kink, it is likely that their life is limited anyway.
Lines should be cleaned regularly with methylated spirits, or cellulose thinners, and a rag, or tissue. You will be amazed at the amount of dirt that you remove. Some people also add a coating of silicone polish. If you fly in rain, this is a great help.
Some authorities advise that you fit fishing swivels to one, or both, ends of the lines. Others advise against this. They are certainly the weakest link and I never use them, nor find them necessary. My philosophy has always been to use the absolute minimum of everything, including connections. If absolutely necessary, I will use a wire loop at one end of one line to cure some difference in trim. Otherwise it's just the handle, the lines and the model. Nothing is adjustable to go wrong. In extreme cases, a given model may have it's own set of lines and handle.
 Method of fine trimming line length.
This is the commonest cry that you will hear on a control-line flying field. Why? Because people are just too lazy to look after their most precious commodity. Take my advice and wind lines in whenever you can.
A common sight is two people transporting one model and it's lines across a flying field. I've never actually seen anyone garroted in this manner, but it remains a real possibility. Meanwhile, every other poor soul in the vicinity has to give way to them.
Do it this way:
Carry you model to the take off point with the lines attached but still on the reel.
Reel you lines out into the circle and attach the handle.
Start your motor and fly.
Detach the handle and reel the lines in.
Carry your model out of the circle.
Nobody is inconvenienced and you don't need a helper other than to release the model - and there are ways of eliminating him!
Up to date information on where control line wire may be obtained can be found here

![]()
![]()
![]()
![]()
![]()
![]()
![]()