Reliability - Setting up - Skids up mode - If only it were that simple... - There is another way - What have we learned from all this? -
Those of us who are in the fortunate position of regularly receiving kits for review will tell you that it is not the envious position that the rest of you imagine. One of the biggest problems is that you tend to end up with several models, with none of them being quite what you would have chosen if you were given a completely free choice.
Having received one of the very first Kalt 'Space Baron' kits in the country for the purpose of producing such a review - which you should have read (elsewhere) by now - it is a very notable exception to the rule. This is one model that I would certainly have chosen, and I am not disappointed.
There have been very few problems with the type. Some people have had problems with the clutch pinion gear wearing rapidly - I didn't - and this has been corrected by a change of material. Early clutch bell/pinions were black in colour and the modified versions are in white. The original clutch also had a fairly short fatigue life of the separate shoes. Mine lasted just 12 tanks of fuel. Modification 1 here was to space the shoes further out and change from trailing to leading type to give an earlier engagement and reduce the amount of flexing. A definite improvement here - 14 tanks! However, this was with the original black clutch still fitted.
Latest kits now have a clutch with a slightly smaller inner diameter which makes the spacers unnecessary. Mine still has the early white clutch plus spacer shims and this has 14 tanks on it to date - making 40 tanks in all. This adds up to about 13 hours actual operation with no other problems whatever. Yes, I have bent it during that time, but we'll talk about that later.
The model was supplied with a Webra 0.28 fitted. This is my second Webra (the other being a 0.61) and both of them continue to impress me. As the motor became run-in it seemed to gain quite a lot of power. It does tend to run a shade on the rich side in the hover and there is no adjustment to cure this. More nitro (5% has been used to date), coupled with richening of the idle and top end settings would fix this, but expense precludes that at the moment. A little bit more power would certainly be useful at times, but the Webra is so reliable and willing that I am reluctant to change it. I did match the custom silencer to the exhaust stack and also drilled out the outlet pipe as much as possible, but the result was negligible.
My kit was supplied with a set of blades weighing around 4.25 ounces. These were soon replaced by a later (now standard) type which had a more forward CG position and a weight of 3.6 ounces. Hovering and forward flight were much improved by these. It is interesting that a reduction of almost 20% in the weight of the blades had only a small effect on the autorotation performance. This is because the later blades were much more controllable during the flare stage, prior to landing. My local shop owner has recently tried these blades on another 'well known import' and was most impressed.
At the time of introduction, the 'Space Baron' was unique in having two lead/lag hinges. In addition to the usual pivoting blade fixing, each blade axle, or 'feathering spindle', is attached to its flapping plate by a single bolt which allows it also to pivot. The slightly later electric 'Concept EP' also features a similar arrangement (same designer?). Initially, the logic of this arrangement seemed rather obscure and I set-up both pivots to be reasonably tight, since I intended to perform fairly violent aerobatics. In this form the model always had a slight up and down shake in the tail boom at just below hovering speed. Various attempts at rebalancing, and retracking, failed to remove this shake, which John Wallington attributed to wrong static tracking. The optional thrust races are fitted to the blade holders but, even before fitting them, no tracking problems were experienced with the heavier blades.
Those familiar with Kalt machines will be aware that they generally fly far better - and smoother - with the blades set very loose. The problem here is that the blades flop about during starting and can also move and cause a boom strike in a poor autorotation. Running the blades loose certainly made the model fly better, but the shake was still there. Finally, the penny dropped - run the blades fairly tight but with the feathering spindles set loose! This limits the actual movement in 'loose mode', but gives all the advantages of loose blades. What's more - no shake!
To the experienced flier, this new breed of small, light, 'plastic wonder' type of helicopter is ideal for practising some of the new types of manoeuvres introduced by Mike Mas and Curtis Youngblood. Whether this sort of thing is actually desirable, or recommended, for those of advancing years like the writer is something we will avoid for the moment!
When I tried to fly my old 'Cyclone' inverted with the use of an invert switch, I always had lots of trouble finding the switch. With practice and careful setting up it was possible to get a reasonably smooth entry, but I never did master the recovery. The usual approach was to take the model up to considerable altitude while I hunted for the switch, and then sort out the model! This resulted in drastic loads on the airframe and eventually led to reliability problems. Just what might have happened in an emergency is something I hate to think about (see below). Moving the switch to the front panel of the transmitter did not really help, either.
I had been aware of the 'Mas method' of switch-less inverted flying for some time but felt that this was a 'one off' arrangement which required more dedication than I was capable of. When it became apparent that many people were mastering this approach I decided that I must acquire a suitable model and try it. At that time the model choice was between the Hirobo 'Shuttle' and the Kyosho 'Concept'. While I was deliberating, the Kalt 'Space Baron' became available. I've always had a liking for the Kalt range, so the die was cast.
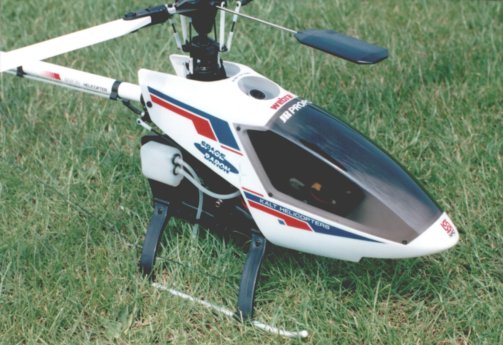
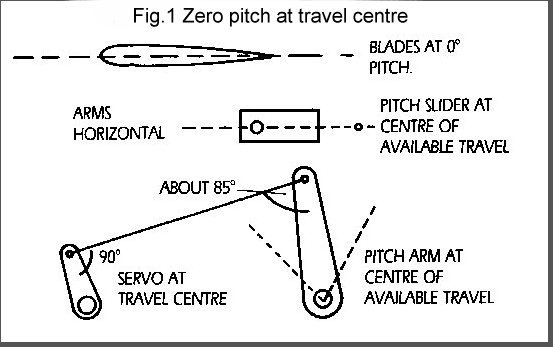
One change was made from the recommended set-up. This suggests that all arms should be set to be level and parallel and the blades adjusted to give 4 to 5 degrees positive pitch. Instead of this, the pitch bellcrank and sliding mixer unit were set to the exact centre of the available movement and all the linkages adjusted until the blades were at zero pitch (Fig.1). This gave a symmetrical pitch range of around plus or minus 10 degrees, and allowed the actual pitch range to be set to any values desired, by means of the JR 'PCM 10' transmitter. It should be stressed here that this arrangement is only practical if you have a transmitter with a number of different pitch ranges available and which gives complete control of each of them.
If you read my article on the 'PCM 10' in a recent edition of this magazine, you may remember that I regarded one of the quirks of the set as a minor problem. The total range of the pitch channel is set by the throw adjustment (FUNCTION 12) and this cannot be exceeded by any other method. In this case, this actually works to our advantage, since the throw adjustment can be set to the maximum available pitch range on the model and you can then fiddle away happily with no danger of stalling the servo.
Note here that most of the pitch settings will be in the upper half of the available range, since you have far more negative available than you need for normal flying. Initially, I set the 'N' and '1' pitch curves to give +4 degrees in the hover, with maximum and minimum figures of +7 degrees and -4 degrees. The 'hold' range was set to give the same figures for low and hover settings but with a maximum of +10 degrees.
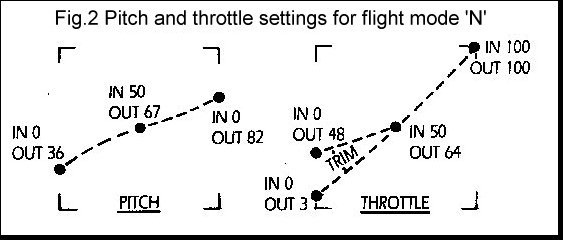
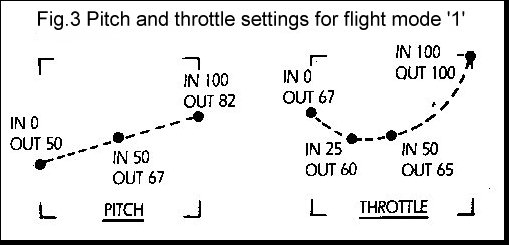
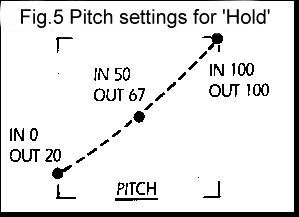
These figures were not too far out but the eventual settings were arrived at by trial and error after much flying. I have not measured the resulting pitch figures since it is my belief that the device which can measure blade pitch to within 1 degree has yet to be invented! Fig.2 shows my eventual settings for pitch and throttle ranges on the 'N' setting, while Fig.3 shows those used for the '1' setting for aerobatics. These are shown for interests sake; if you try the same set-up, your figures will vary somewhat. Remember that any change made to the hover setting should be transferred to your 'Hold' curve to avoid unpleasant surprises. Fig.5 shows my eventual 'Hold' pitch settings.
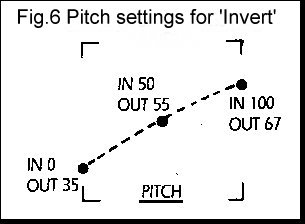
With the 'PCM 10', I now had two ways of flying inverted available (but see later). For interests sake, I did set up an inverted pitch curve using the invert switch and a pitch gauge, though I have never used it. This came out as shown in Fig.6. Note that it is necessary here to use one of the existing throttle curves as there is no separate inverted throttle adjustment.
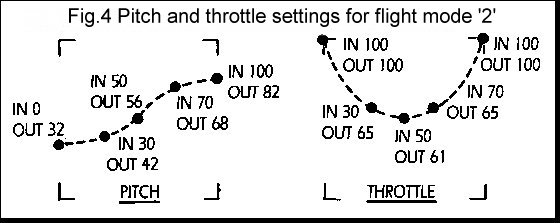
The method that I have actually been using was to set pitch curve '2' to give identical up and down movement and the throttle to open when the stick was moved away from the centre in either direction (Fig.4). You can use the same figure for the maximum positive pitch as the 'N' or '1' curve and the centre of the stick travel is already set to 0 degrees. It is a fairly simple matter to work out the figure needed to give an identical amount of maximum negative pitch. These figures are only a starting point and depend on just how accurately you manage to set that original figure of 0 degrees pitch at stick centre. Study my eventual values in Fig.4 and you will see that I was some way out. At first, I set both the pitch and throttle curves to give straight lines between the centre and end points. This was far from ideal and I had to introduce intermediate values.
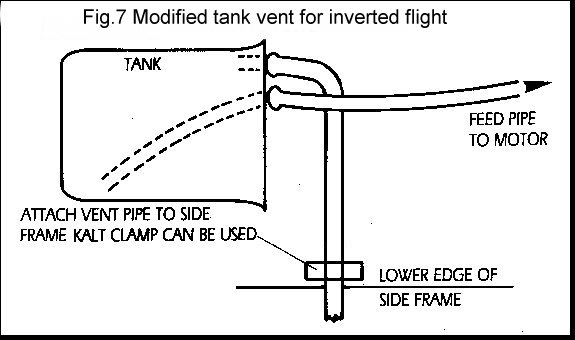
Fuel feed for inverted was taken care of by simply extending the vent pipe down below the tank with silicon tubing (Fig.7). In the inverted position, the end of the vent is above the tank which prevents the fuel from running out.
Full of optimism, I set out to fly the beast around and see what happened. I have done quite a lot of fixed wing inverted flying in my time and did not anticipate any real problems in actually flying around the sky (hovering is another matter) other than reprogramming my grey matter to accept the reversed throttle. The 'Space Baron' is naturally nose heavy and I assumed that - like a nose heavy aeroplane - it would nose down inverted and that some forward stick would be needed to fly level - this I could cope with (thinks, in retrospect: when did I ever use back stick to fly a helicopter around upright). Surprise, it nosed up inverted!
I spent quite some time flying around in a switchback pattern while honing the inverted pitch range. Outside loops - fine! Inverted immelmans - fine! Inside and outside tumbles - fine! Straight and level - no way! Fixed wing models have the advantage of being fitted with a device on the front which keeps them moving forwards. Helicopters are a different animal - as I'm sure you are all aware!
Ah now, wait a minute. Suppose we use one of the programmable mixers to apply back cyclic when the pitch goes negative. Mix pitch into elevator and juggle the directions to suit. At last I could now hold in a little forward stick while inverted and fly around in a fairly straight and level attitude.
Had I but known it, I had now set myself up beautifully for my eventual downfall. However, a few more facts are needed to complete the picture.
In the hope that I would eventually be able to learn to hover inverted I had also used a mixer to mix throttle into rudder so that I could achieve some degree of ATS action with the rudder moving in the correct direction. This was automatically switched in when the '2' pitch curve was selected. I was also using the facility which zeroed the tail rotor pitch when the 'hold' switch was operated. The problem here was that operation of the 'hold' switch when the '2' pitch curve was selected meant that the mixer caused the tail pitch to go hard left due to the throttle being closed. This meant that some care was needed if you wanted to do an autorotation straight out of the inverted set-up. I eventually discovered that this could be cured by setting the mixer to use only the upper part of the throttle travel.
The other problem which took some time to appreciate was that operation of the 'hold' switch did not turn off the mixer between pitch and elevator and that this meant that an autorotation from the '2' pitch setting was not to be recommended. All of this added up to the fact that I had trained myself not to auto without switching to the 'N' or '1' pitch curves.
So, there I was one Sunday morning, happily tumbling away when the motor stopped. Actually, it was a shade lean and my instinctive reaction of closing the throttle caused it to pick up again! In fact, the motor would run with the throttle stick anywhere between the two extremes, but either fully open or fully closed caused it to cut. There followed several minutes (probably about 3 seconds) of wonderful aerobatics with the motor stopping and starting and the model getting lower and lower, while my brain screamed "don't hit the hold!". Eventually, the model whistled over my head at about 10 feet altitude and headed straight towards a certain Dave Nieman, who was now running for his life. I turned the model to miss him and the ground leapt up and hit it.
Discussion with Dave afterwards (what a wonderful, understanding, man he is!) led to the consensus that these new fangled methods are not for old fuddy duddies and that, if you must, it is advisable to have all of your models set up the same way to avoid confusion. It also seems to me that you should find a set-up that allows you to, at least, attempt to autorotate out of it in an emergency. This is also an argument against the 'conventional' invert switch arrangement, of course.
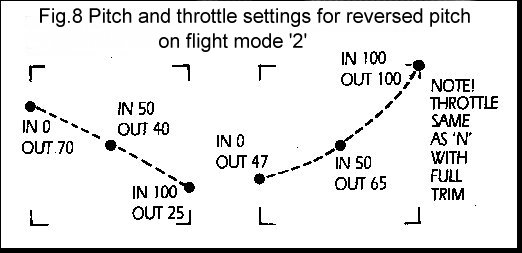
Using the 'PCM 10', there is another way that you can use to fly inverted
which forms a sort of 'middle' route. The '2' pitch curve can be set up to reverse the pitch channel (Fig.8) and also give you a fully adjustable inverted throttle curve. I find it much easier to find the pitch curve/flight mode switch than the invert switch and am considering trying this method.
If you want a full invert facility, this can be achieved by mixing the rudder and elevator channels with themselves twice. This needs two mixers for each channel. Mixing elevator into itself in reverse means that the elevator stick now does nothing. Repeating the same process with a second mixer means that the elevator is now reversed. Ensure that both mixers are switched on only when pitch curve '2' is selected. Do the same thing with the rudder channel and pitch curve '2' now becomes invert. I have not tried it in the air, but it works on the bench.
Note that both methods have the same disadvantage that you cannot autorotate without first turning them off!
To summarise all of that; there are 4 ways that you can use a JR 'PCM 10' to fly a model inverted:
a) Use the invert switch in the manner intended.
b) Programme pitch curve '2' and it's associated throttle curve to allow inverted flight with a reversed throttle stick action.
c) Set pitch curve '2' to give a reversed pitch channel.
d) Use pitch curve '2' as an invert switch.
First of all, the 'Space Baron' is tough! Damage from a full bore pile in was restricted to broken blades, bent flybar, kinked boom and broken U/C legs (I replaced the head flexiplates as a precaution, but they weren't bent). It is also capable of just about anything that you ask of it in standard form.
With a modern model and radio, the sky is the limit, but care is needed to find a set-up that will not use up lots of models - and bystanders. We know that switchless inverted and unlimited aerobatics are possible, but - as I have said elsewhere - learning them probably needs a young brain as well as Youngblood.
