The kit - Design concept - The revue kit - Assembly - Installation - Flying - Conclusions - Specification
Having always had a strong liking for smaller models, and Cox powered machines in particular, I was enthralled to learn about the 'LMH-100' (what a mouthful?) and decided that this was the one model that I just had to build. Right now, somebody will be saying, "He always says that." In this case, however, the emphasis is on the word 'build', because this is much more than the usual assembly job.
I did have a certain amount of doubt about the tractability of the motor concerned, particularly as this is a fixed pitch machine (remember those?). In common with many other people, I wondered why it wasn't just a bit bigger and fitted with an OS '10'. Having flown it, I wonder why it wasn't a bit bigger anyway , as it is certainly not lacking in power!
'Superb' is an over-used term, but it is fully justified in this case. Every part of the kit, from the manual to the superbly die-cut wooden parts, is beautifully done.
Those wooden parts fit together to form a 'keel' which carries the motor, mainshaft, undercarriage, boom and radio equipment. Even the ply itself, which is 3/32 inch thick 5 ply, is about the best that I have seen anywhere. The various parts fit together beautifully. The undercarriage consists of piano wire struts and plastic skids which lock together. The complete U/C assembly is then attached to the keel by nylon tie-wraps.
The rotor head and main blades consist entirely of plastic mouldings. This includes a one-piece flybar assembly which pivots on a straight piece of piano wire. This is a general feature of the model, in that anything which is not a plastic moulding is either a bolt (American threads) or a piece of wire (some of those have threads too).
Much the same applies to the tail rotor assembly, with its almost unique flybar-cum-gyro. In fact, this is just about the most exquisite combination of bits of plastic and wire that I have ever seen and it operates unbelievable freely and smoothly, without any fiddling being necessary.
The manual is very thorough and covers each step of the assembly in great detail, with diagrams and notes.
This includes the radio installation which gives separate details of each linkage and explains in detail how to adjust the throttle linkage to give the right results.
This is not a matter that we normally concern ourselves with, but it is worth considering with this machine. Both the main and tail rotor heads are probably unique. It could be said that the main rotor head is a Bell/Hiller type with no cyclic (a fixed pitch head on which you can track the blades), while the tail rotor is Bell/Hiller with no collective!
The whole point of this arrangement is that it can be flown with a standard 4 channel radio with 4 servos. This is why it is said to aimed at the beginners market. This may well make it very attractive in the US, but the servos must be 'micro' types and, in Europe, this makes them cost as much as five standard servos and a gyro.
Add to this the fact that the motor requires high-nitro (at least 35% - not generally available in this country) fuel and your cheap, simple beginners model soon becomes an expensive, simple beginners model. It's also worth pointing out that the lack of an exhaust manifold means that the exhaust residue goes everywhere. You will certainly spend more time cleaning it than you ever will flying it!
This is the reason why the model may remain an oddity in this country - although lots of people are interested in it.
This is one of three kits that were imported by a potential distributor for evaluation, and included the Cox 'TD 051' motor with exhaust throttle sleeve, heatsink head and special prop driver, together with three 'GloBee' heads. The kit also included a spare tailboom and a second vacuum formed canopy. This latter feature is standard, but the others may not be. Retail price in the US is understood to be $199.95. If imported in any quantity, this likely to equate to close to Ł300!
Packing of the kit, like everything else, is superb. Some effort has gone into ensuring that the two canopies don't get crushed and all the other bits are packed in the familiar numbered plastic bags.
There are two manuals. One tells you how to build it and the other covers the theory, setting up and operation. Each one is an object lesson to others on just how a manual should be produced. There are numerous clear sketches and everything is covered in minute detail.
The suggested method of assembling the wood keel is to tack things together with cyano and then go over the joints with slow cyano to form fillets. No doubt this works well, but as a traditional aeromodeller, I couldn't resist using balsa cement. This also worked well, but oh for some 'Durafix'! After a couple of coats of dope, I finished things off with Humbrol enamel for convenience, but the fuel used really needs something more resistant. There is also a thin plywood fin which needs painting, but there is an ample supply of leftover plastic card which matches the canopy exactly, so I made a fin from that instead.
One of the many ingenious features of the model is that there only four ballraces; two on the mainshaft and two on the tailshaft. The tail blades interlock with each other and the assembly is very free despite the fact that the centrifugal loads are taken by teflon washers. Although it looks complex at first sight, the tail assembly is virtually foolproof and the mouldings are so good that no 'fettling' is required.
The tailboom is clamped between two mouldings that are bolted to the keel. By twisting this assembly slightly and pulling the boom in or out, you can adjust the mesh of the tail drive gears. I suggest a little slow cyano between the boom clamps and the keel so that the mesh stays as set.
All that is necessary with the canopy is to trim the two halves and join them with slow epoxy. Paper patterns are supplied for stick-on film to fit the air intakes and glazed area, although this material is not supplied. However, black and white material for blade tracking is included.
One of the interesting features of the rotor head is the use of flapping hinges, which allow the blades to fold on impact. The blades themselves are said to be indestructable and, so far, have lived up to this claim.
There is no flybar, as such, its place being taken by a lifting sub-blade. This has weights at each end (actually, four large grubscrews threaded into the plastic), which lead to a lot of extra weighting being needed to make it balance. My suggestion here is use a simple set of scales to select the grubscrews in advance, so that you have two similar sets. No, I'm not going to remove them and do this - they were hard enough to get in!
Just follow the instructions! It really is that simple.
The throttle linkage is fully described and tells you just where to set the throttle sleeve at each end of the travel. This is not too far out but, if you are doing things as intended and using a straight four channel set, you will do a fair amount of fiddling until you acheive a reliable tick-over - and then it will not hover in the middle of the stick. You can do things this way, but impatient types will get on better with a computer transmitter so that you can set things up just right.
Having gone through the procedure described above, I did eventually manage to fly the model on a simple transmitter. However, having watched John Wesley and Clive Coote,of Ripmax, fly it far better with an 'FC-28',
I am now using a '9ZAP'!
It actually flies very well, but needs much use of the throttle, simply because of the exponential effect of a rotary exhaust throttle. If the model is sinking, a small application of power makes the motor suddenly 'come on' with a sudden climb accompanied by a large tail swing. This is an inevitable result of a fixed pitch model with its changes of engine speed. That mechanical tail gyro works extremely well, but it cannot compensate for a large change in the torque. The use of an ATS system should help here, but the model is intended for simple radios, remember.
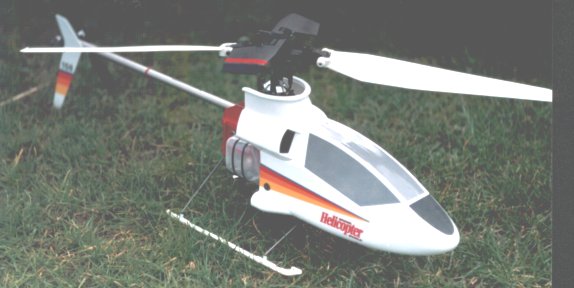
During the session which produced the accompanying flying photos, I found that I could not land the model because the throttle trim was too high. Imagine flying a small model in very blustery conditions and having to release the cyclic to reach across and lower the throttle trim!
Nonetheless, it has been tipped over several times without any damage. One really hard 'arrival' resulted in the breakage of the two tie-wraps which hold the front undercarriage strut to the keel. The only other damage was a broken output gear in the aileron servo. I have manged to convince myself that this was the cause, rather than the result...
It is far more flyable than I ever expected, but I have great doubts about its suitability for beginners. Having said that, it is certainly tough!
At the sort of price that it is likely to cost in the UK, you are unlikely to see many of them around. If it was 25% bigger, with an OS '10', the situation might be very different. In the USA, I expect to sell well and to become very popular.
If it wasn't such a pain to clean, I would love it.
Excuse me, I must repaint the top of my flight box!
| Product | 'LMH-100' |
| Manufacturer | Lite Machines Corporation, Purdue Research Park, 1291 Cumberland Avenue, West Lafayette, IN 47906, USA' |
| UK Importer | To be confirmed |
| Main rotor diameter | 24 in. (610 mm) |
| Tail rotor diameter | 7.5 in. (191 mm) |
| Length | 26.4 in. (671 mm) |
| All up weight (dry) | 26 oz. (738g) |
| Main gear ratio | 11.33:1 |
| Main to tail gear ratio | 1:2.2 |
| Control requirements | 4 micro servos |
| Powerplant | Cox 'TD 051H' glow-plug engine |
