The kit - The fuselage - The mechanics - Painting - Flying - Conclusions - Finally - Specification
If you read the revue of the original 'HyperFly' back in the June issue ('MHW' June 1995), you will be aware that it is a two channel helicopter which is closer to an aeroplane. Not all of the dictionary definitions of a helicopter refer to the ability to hover, or take off vertically, so it would appear that the 'Hyperfly' may be a helicopter, after all. Having got that out of the way, it should come as no shock that Kyosho were already making plans to produce something which looked a little more like a full-size machine.
Ask the man in the street to name a helicopter and he will probably say, "Apache". Right first time, though we understand that it was going to be a 'Cobra' at one time.
All you readers who are heavily into state-of-the-art model helicopters will probably be feeling by now that this has gone beyond a joke, and we would have agreed with you until we saw pictures of the prototype. We managed to squeeze one picture into last months 'Coming Next Month' (Oct '95) feature and kept our fingers crossed that the promised revue kit would appear in time for this issue. In fact, it arrived the day after our copy date and lead to a midnight oil burning session to get it finished.
Well, there really isn't that much to a 'HyperFly' is there? Wrong! The rude awaking came when we saw the kit. Sure enough, the mechanics were straightforward and almost built anyway, but that fuselage!
This will be available in two forms: as a complete package including two channel radio, battery and charger, and as a kit for the model only. For various reasons, the review kit came in the box intended for the complete package (see photo) but only contained the model itself. When you open the box you wonder whether it is all there. There is an inner box with the rotor blades and the assembled mechanics on its top surface and all the other bits inside. Apart from that you get the various fuselage mouldings, a manual and a decal sheet.
This consists of six clear plastic mouldings. The box says 'polycarbonate', which we take to mean Lexan. There are left and right halves of the main body, left and right halves of the tailboom/fin, the canopy and one moulding which makes left and right stub wings and stabilisers.
The instructions refer to a protective coating and we had already been warned that this was the cause of the rather dull finish. It was not until the actual cutting and trimming was started, however, that it was realised that the coating was, in fact, a clear plastic film which had to be peeled off.
There is an overlap between the left and right halves which has to be cut to form tabs which alternately interlock with each other. Have you ever tried doing some precision cutting on completely clear plastic? Did we mention that it is very thin? Actually, it's about bubble pack thickness. Having assembled the two halves and then retained them with pieces of tape, you are instructed to pour cyano down the joint. It doesn't tell you that it makes the plastic blush!
To those of you who may be finding this a little off-putting, let's stop and reconsider. If you are a real modeller who likes making things, the process of assembling the fuselage is most enjoyable, although fiddly and sometimes frustrating. However, consider the following:
1 The fuselage has to be painted (the manual even tells you to paint the windows), so why is it clear? Coloured plastic would be much easier to handle.
2 Tradition says that Lexan is difficult both to glue and paint.
I tried most of the various types of cyano and discovered that the thin variety is the one to use. Curiously enough, the thicker types didn't seem to work too well.
Having got things together and produced a fairly convincing blushing clear 'Apache', you are instructed to cover the joints with the strips of clear decal material provided, this is rather thick and doesn't like compound curves at all, but is necessary to cover all those overlapping bits. It does tend to be very noticable under the paint, however.
The main mechanical assembly, complete with servos, is bolted to the fuselage sides, while the undercarriage, switch and battery retainer are simply bolted to the floor of the fuselage. Despite the apparent fragility of the fuselage, the complete assembly is surprisingly rigid.
The canopy is held on with self-adhesive velcro pads and it is important that the areas where the velcro is to attach are free of paint. Leave as much material as you can on the fuselage around these areas - too much flexibility will make it difficult to press the velcro together.
These are standard 'HyperFly' and come almost ready to use. You have to assemble the on/off switch and install the servos. Any size of servo can be used and an old 27Mhz two-channel car set is ideal (Not 40 Mhz). The servos are attached directly to the rear of the mechanics and the links are ready made to the correct length with a full-size drawing to help.
Remembering our experiences with the original machine, the switch was deliberately left on the stiff side to avoid any possibility of it operating accidentally.
All the connections are ready made or in the form of push-on connectors.
The battery is installed right up in the nose and needs some thought as to which way the battery is to face. It needs to lie on its side in order to fit and you have a choice of whether the cells point across or down the fuselage. Access is tight, since the switch is very close and the battery has to go under the 'dash' so to speak.
With the reputation of Lexan, some time was spent agonising over this. Having built a Morley 'Huey' a few years ago, I knew that the only correct shade of paint available (until you start looking, you would never believe how many different shades of 'Olive Drab' there are!) was Humbrol 'No.155'. This seems to be difficult to obtain in the average model shop ('No.155' that is), but Beatties and Hobby Stores do stock it.
If you are intending to spray the fuselage, a lot of awkward masking will be required to paint the fin and tailplane and, after due consideration, It was decided that brushing was probably the easiest way to tackle things and two thin coats were applied, with acceptable results. So far, the material has not suffered from this and the paint seems to be adhering without problems. This only added about half an ounce to the weight.
A very nice decal set is supplied which features matt numbers and 'Army Air Force' labels. Unfortunately, the surrounding areas are glossy and this sticks out like a sore thumb on the model. You can solve this with an overcoating of matt varnish, but time was running short, so this will come later.
There is simply no point in painting the undercarriage or rotor head. Both of them are so far away from the real thing that it is best to pretend that they aren't there.
Final all-up weight came to 26.75 ounces, which is only about one and a quarter ounces heavier then the standard 'HyperFly'. Not bad for a scale fuselage!
The original machine proved easy to fly in all conditions so there were no fears in this direction. The only real question was regarding the landing.
Flying characteristics are very much 'fixed wing' in type and an experienced fixed wing flyer should have no real problems. Experienced helicopter flyers with no fixed wing experiences may have a steep learning curve, however.
There is no hovering capability and the machine must fly forward all the time. Yes, you can 'hover' in a suitable headwind, but the model will be either climbing (usually) or descending (when the batteries are almost flat).
In calm conditions you can almost leave it to choose its own flight path, or trim it for hands-off circuits. In windier conditions, a 'slope soaring' approach consisting of lazy eights into the wind is a better approach. You can tack backwards and forwards across the wind at high speed, but beware of failing batteries. If caught unawares, the best approach is a sharp turn into wind and 'dump' it.
Landing is best attempted sooner, rather than later. Control is rapidly lost as the head speed falls and you do need control to land it. The best approach is a high speed 'run-on'. If the speed (both forward speed and rotor speed) is low, a boom strike becomes a major possibility. Note that rough grass is not recommended.
I did overhear a conversation in a model shop where an intending 'HyperFly' purchaser (who obviously had no flying experience) was rather put out to learn that a typical flight would only last about three minutes. I would have been prepared to bet him the price of a kit that he wouldn't keep it up that long!
So, how went the first flight of the 'Apache' (sounds like a good title for a film)?
The first thing that strikes you is just how do you launch the beast? You need two hands to do this (meanwhile, your third hand is holding the transmitter), one to switch on and one to launch. Now, obviously you need to hold the model in your launch hand in such a way that you can pull down the switch operating arm with your second hand. This means that your first hand needs to hold the model at a point which allows ample clearance for the arm. On the original 'HyperFly', this doesn't present any problem. On the 'Apache', however, it means that you are hanging onto flimsy Lexan. Ideally, the place to hang on would be between the undercarriage struts, but this would seriously obstruct the switch arm. The best solution appears to be to hold the flexible rear fuselage as best as you can while supporting the weight of the model on the rear undercarriage strut by your little finger. Oh, yes, keep the transmitter aerial well clear - ask me how I know! Eagle-eyed readers who have read the 'HyperFly' review which appeared in 'RCMW' will note that they use Rx aerial as an abreviation for transmitter aerial!
Once the motor is running, the need to support the weight disappears and it is more a matter of hanging on while you decide where you left the transmitter. Yes, of course two people would make the whole process much more pleasant - but back to the 'Apache'. After all this agonising, the first flight, in very blustery conditions, was a total anticlimax. The 'Apache' seems to be much more stable than the original machine and, once trimmed, you could let it go off on its own while you find the transmitter.
Landing also seems to be easier. The one situation to be aware of is that where the model is flying low in ground effect and disappearing into the distance without the height or power to turn. Fixed pitch helicopter flyers will recognise this one - it just doesn't want to come down. You just have to push the stick forward and fly it onto the ground. If you do run the batteries down to the point where it simply quits flying, it seems to cope quite well providing that the ground is reasonably smooth.
The biggest problem with the review machine is seeing it. Interestingly enough, the manual would seem to advise you to paint it white. Anyone seen a white 'Apache'?
It's still in one piece and the paint hasn't come off yet!
If you take your model helicopters (too) seriously, you probably haven't read this far. However, if you want to enjoy the fun side of the hobby, both the original 'HyperFly' and the 'Apache' have a lot to offer.
Think about it. A simple, two channel scale helicopter! What more could anyone need? And who else makes an 'Apache' fuselage?
It has all the appeal of the original 'HyperFly' and, now that Kyosho have shown the way, the possibilities are endless. I'm already making sketches of a 'Chinook' using two sets of mechanics!
As a matter of interest, I did try the fuselage against a 'Whisper' and it looks like it should fit. And there is, of course, a 'Cobra' body made for the 'Whisper'. Hmm.
| Product: | 'HyperFly Apache' |
| Manufacturer: | Kyosho, Japan. |
| UK Importer: | Ripmax Plc, Ripmax Corner, Green Street, Enfield, EN3 7SJ. Tel: 0181 804 8272. Fax: 0181 804 1217. |
| Main rotor diameter: | 23.25 in. (588 mm) |
| Tail rotor diameter: | N/A |
| Length: | 37.4 in. (950 mm) |
| All up weight (dry): | 26.75 oz. (760 g) |
| Main gear ratio: | 7.33:1 |
| Main to tail gear ratio: | N/A |
| Control requirements: | 2 servos |
| Powerplant: | Electric motor supplied. Driven by special six cell 1100 mAh battery (not supplied) |
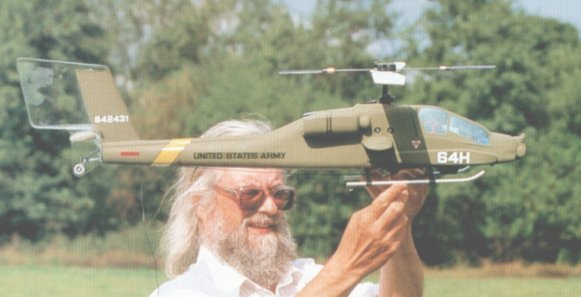
Additional information originally used as photo captions.
There is a lot of upainted area around the tail. It is easier to brush paint it than to mask it.
The joint between the main fuselage and the boom is a little difficult. We 'cheated' by using a couple of screws to hold it all together during gluing. This was later covered by the clear decal material.
The rotor head is fairly simple but very effective. Tracking is acheived by bending the glassfibre plate.
Battery access is fairly restricted. It is simpler to charge it in situ.
The instructions suggest that you paint the inside of the windows, but a light misting of metallic blue is more effective.
The skids don't detract from the appearance as much as you might expect. It is difficult to put enough pressure on the velcro at the front of the canopy to get a snug fit.
Side wings and stabiliser halves are single surface mouldings which are glued to the fuselage sides. The mechanics are held in position by screws.


![]()
![]()
![]()
![]()
![]()
![]()
![]()