Theory of operation - Construction - Parts list - Testing and setting up - Finding fault - R9 and R10 - Other uses - Conclusion
There are many ways of switching an electric motor on and off from one channel of a modern digital R/C outfit. The simplest method is to use a servo to move a slide or toggle switch. However, it seems a little bit pointless to use a motor to switch on a motor!
It is, of course, possible to switch on a motor directly from an R/C channel by means of power transistors. The problem here is that any transistor with give a voltage drop of approximately 0.6 volts and produce a fair amount of heat doing so. Add to this the fact that the more power you are switching, the bigger (and more expensive) this transistor must be. For electric flight purposes we wish to keep losses to a minimum which means that the humble relay has much to offer. A relay, in theory, has no losses, though after some use the contacts will become dirty and produce a voltage drop.
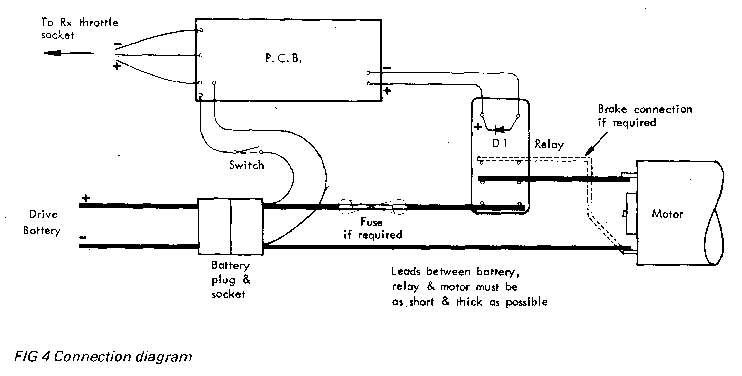
When this reaches the point where there is a noticeable loss of performance, it is easier to replace a couple of pounds worth of relay than to delve into the electronics and replace several pounds worth of power transistor. The relay can also be easily mounted between the battery and motor, thus keeping connections as short as possible.
First attempts were made by using a commercial servo IC which could operate a relay directly without any intermediary transistors. While this was successful, it was intended that the radio should be operated from the drive battery and this required a means of switching off the motor automatically before the voltage dropped to a level which would be dangerous to the radio. By adding a transistor between the servo IC and the relay it was possible to arrange for this to be operated by another IC such that the servo IC was disabled.
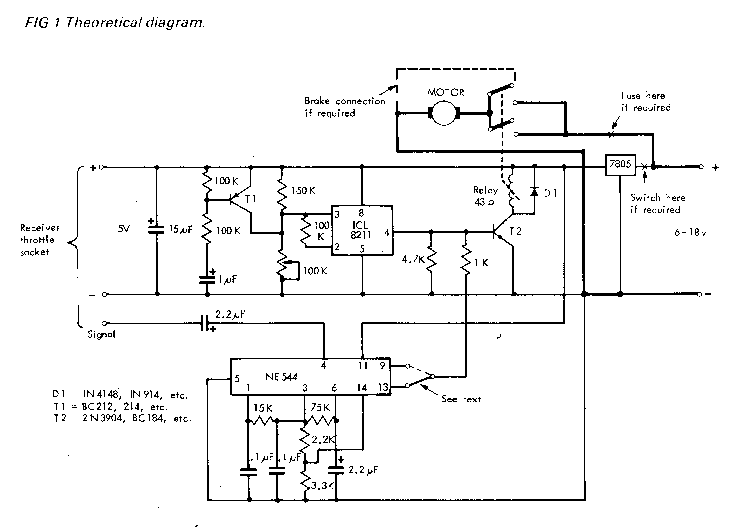
Referring to Fig. 1 the NE 544 servo amplifier IC (IC.3) is arranged to switch the relay in and out by means of transistor T2. Only a minimum of external components are needed to accomplish this with the switching point being determined by R9 and R10 which replace the normal servo pot. The values given (2.2k and 3.3k) ensure that the relay switching point will occur at 1.5ms which falls within the stick range of most R/C outfits available (see later). If you wish to make this point adjustable, simply replace these two resistors with a 5k preset potentiometer
The actual output from IC3 to T2 can be eitherfrom Pin 9 or Pin 13, this will depend on the throttle 'sense' of your particular R/C system. T2 can also be switched by IC2 which is a latching, voltage-sensitive switch. The point at which this operates is decided by the 100k preset potentiometer VR1. Once triggered, it can only be re-set by switching the supply off and on, which allows T1 to put a short positive pulse on to Pin 3 which resets the latch.
IC1 is a voltage regulator IC which supplies 5 volts for the R/C equipment. Note that the normal receiver battery is not required.
Diode Dl by passes the back EMF from the relay coil and protects transistor T2 from possible damage.
The contacts of the relay specified are rated at 5 amps at 30v DC for 10,000,000 operations. ParalIelling them gives 10 amp rating
Several options are shown. A fuse is not really necessary since any dramatic load on the system should trigger IC2 and switch off the motor. The switch could be dispensed with by making the baffery plug easily accessible.
Some motors freewheel on the glide and if you are using an easily breakable prop or feel that the motor shaft may get bent on landing then the brake connection can be used.
| R1 | 100k | ) 1/4 watt |
| R2 | 100k | ) |
| R3 | 100k | ) |
| R4 | 150k | ) |
| R5 | 4.7k | ) |
| R6 | 1k | ) |
| R7 | 15k | ) |
| R8 | 75k | ) |
| R9 | 3.9k | ) |
| R10 | 2.2k | ) |
| C1 | 1mF | ) 35v tantalum |
| C2 | 15mF | ) |
| C3 | 2.2mF | ) |
| C4 | 2.2mF | ) |
| C5 | 0.1mF | ) Disc ceramic |
| C6 | 0.1mF | ) |
| IC1 | MC7805P | |
| IC2 | ICL8211 or RS8211 | |
| 1C3 | NE544 | |
| T1 | BC212, BC214, BC212L, BC214L, etc. | |
| T2 | 2N3904, BC184. etc. | |
| D1 | Any silicone diode (1N4148, 1N914, etc.) | |
| Relay | DPDT 6 volt type RS 349-642 53ohm coil (Radio spares); WE RL113 43ohm coil (Watford Electronics) | |
| Veroboard | 2.6in x 1.3in x 0.1in matrix |
Plug in the drive battery, switch on and check for 5 volts at the receiver plug. If all is well, plug into the receiver and check that the receiver works by plugging a servo into another channel.
Adjust VRl fully anti-clockwise and check that the throttle stick on your transmitter will operate the relay. Assuming that it does, check that the 'open' throttle position causes the relay to pull in. If it works in reverse (ie drops out on 'open' throttle) change R6 from Pin 9 on IC3 to Pin 13 or vice versa.
Put the throttle stick to 'open' position so that the relay pulls in and slowly wind VR1 clockwise. At some point the relay should drop out. When it does turn VR1 slowly anticlockwise until it pulls in again. Once again turn it clockwise and try to get it into a position roughly midway between the points where the relay pulls in and drops out.
Once you have established this position, turn VR1 clockwise until the relay drops out, then return it to the mid point already determined with the relay still out. Switching the supply on and off should now cause the relay to pull in. Assuming that all has worked so far, now connect up the motor and check that you can turn it on and off with your throttle stick. The motor should switch itself off when the drive battery shows signs of becoming discharged, at which point there should still be ample power to operate the radio equipment for some time.
If you cannot get the relay to operate, disconnect Pin 4 of IC2 from T2 by lifting one end of link 'A'. If it now works, the problem is in 1C2 or associated components.
To check the operation of 1C2, monitor the voltage at Pin 3. This should be above 1.2 volts. 1C2 will trigger if it falls below 1.2 volts.
If the voltage is higher than 1.2, momentarily short out T1 to check that this will reset 1C2. If it does, the problem is in T1.
As previously stated, these are chosen to give a switching point at approximately 1.5ms. If some other switching point is required, the appropriate values can be calculated as follows:
Both values should then be corrected to the nearest standard resistor value above the calculated value.
A forward and reverse system could be built by using two units arranged to operate at different pulse lengths and with one operating in the sense opposite (i.e. relay in with throttle stick in closed position). Only one unit would need to have IC1.
IC2 can be used on its own as a low voltage alarm system. Pin 4 will operate any LED directly.
If you wish to retain the receiver battery supply and switch, simply omit IC1 and the connection to the drive battery.
For a twin motor, twin battery system, use two units with a 'Y' lead to the receiver but only connect one of the 5 volt positive lines to the receiver.
By omitting switches, fuses, receiver battery, etc., the lightest possible system can be built with the added virtue that the relay can be between the motor and batteries to reduce losses, while the remaining components can be mounted anywhere in the model.

