The hobby/sport of flying radio controlled model helicopters is one of the fastest growing branches of the whole R/C hobby. So much so that even those dedicated flyers who are fully in touch with the situation can sometimes discover items - or even whole models - that they did not know existed.
To the average fixed wing flyer, who may be tempted to 'have a go' at helicopters, the situation can be one of total confusion which soon leads to discouragement. With that in mind, this article is aimed at those who are familiar with the general R/C scene, and probably proficient fixed wing flyers, but who know little or nothing about helicopters. Therefore, it is assumed that we can concentrate entirely on the models and the differences between them and other R/C model aircraft.
Those of you who may be seriously contemplating buying a helicopter should be made aware that experienced help is invaluable. This may be hard to take for those of you who have been flying fixed wing models for a great deal of time. However, you are exactly the person that needs help, since your fixed wing experience - and those hard-won reflexes - can lead you into lots of trouble when attempting rotary flight. In your case, you have a lot to 'unlearn' before you can really start learning.
The total newcomer does not have these problems. His troubles lie in other areas.
Flying a model helicopter is not difficult. However, the initial learning process needs a lot of perseverance. Fortunately, modern machines have made the process much easier. This may not be very reassuring to those who are crashing their model with depressing regularity but, unless you are one of those very few unfortunate people who cannot master it, it can be done.
Once past the initial hurdle of learning to fly, there is literally no limit to the challenges that lie ahead. To most people that is the real fascination of the beast.
Everyone knows that aircraft have to move forwards in order to produce lift and need long runways in order to become airborne. Helicopters, however, do not need to move forwards and can hover motionless. The reason for this is that the wings (or rotor blades) of a helicopter are rotating and are still moving forwards when the helicopter is stationary. An aircraft needs a propeller or jet engine to pull or push it forwards through the air, while a helicopter uses the power source to turn the rotors.
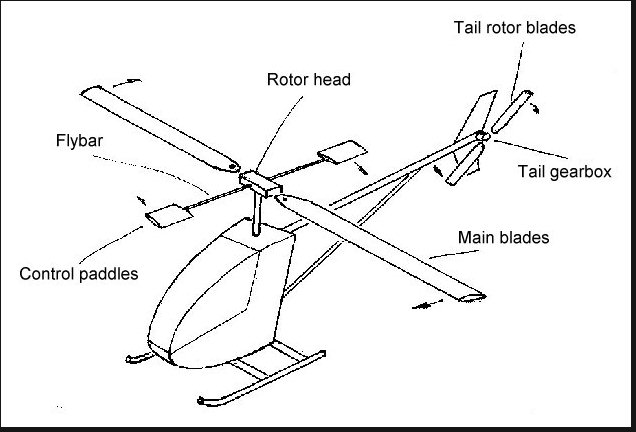
The problem here is that the force (torque) which causes the rotor to rotate in one direction also tends to make the rest of the helicopter rotate in the opposite direction (known as torque reaction). There are several ways of dealing with this, but the most common system uses another, smaller rotor mounted at the tail (the tail rotor) to provide a sideways push to cancel out the torque reaction.
Except in the case of specialised scale models, model helicopters usually employ main and tail rotors having two blades. The main rotor will have a stabiliser bar (flybar) at right angles to the main rotor with control paddles mounted at each end. This is the type of model which should be used for learning to fly; the newcomer has more than enough problems to contend with without making matters worse by trying to cope with an unnecessarily complicated model.
Several variations on this basic arrangement are still possible - and available. The simplest form is known as a 'pod and boom' helicopter and consists of the mechanical components, plus a lightweight fairing around the front section. A tubular boom (tailboom) connects the tail rotor to the main section. The fairing may be supplied finished apart from applying self adhesive stickers, or may require assembly and painting.
These same mechanics can be fitted inside a fuselage (scale or freelance), either with or without the tailboom. This arrangement is very attractive and has certain benefits in terms of visibility, but should be avoided by the newcomer for the reason already given. Scale models of fullsize helicopters should also be avoided, since these inevitably involve compromises which make things even more complicated. In both cases, the fuselage will require some effort in finishing and painting and is the first thing to be damaged in the most minor incident.
Most models are powered by a small internal combustion engine which burns a methanol based fuel. In order that the engine can be started without the rotors turning it is connected to the rotors by a centrifugal clutch. This engages automatically when the engine speed exceeds a predetermined value. When the engine is idling or 'ticking over', it is not connected to the rotors.
Included in the reduction gearing (which can be single or multi stage) at some point will be a separate output to drive the tail rotor. This drive can be via a long rotating shaft, or a rubber toothed belt. With a shaft drive, more gearing is required at the tail (tail gearbox) to turn the drive through 90 degrees. Belt drive is much simpler and requires only a toothed pulley. Generally the tail rotor speed is around 4.5 to 5 times as fast as the main rotor.
Turning the model around its vertical centre (the main rotor shaft) is done by changing the pitch of the tail rotor. Remember that the tail rotor is already supplying a push to balance out the torque reaction. Reducing this push (less pitch) will make the model turn in a direction opposite to that of the main rotor. More pitch means that the model will turn in the same direction as the main rotor.
Moving the model in any direction is achieved by tilting the main rotor disc in the required direction. This is done by changing the pitch at one point in the rotors travel around the main shaft. To move the model forward, for example, the pitch is increased when the rotor blades pass over the tailboom and reduced when the blades are in front of the model. This raises the rear of the disc and lowers the front, causing the model to tilt forwards. This produces forward movement. Reversing the effect stops the forward movement or causes the model to move backwards. A similar control tilts the model to either side. Combinations of the two can produce movement in any direction.
Note! This is a grossly oversimplified version of what actually occurs, but will suffice to allow the controls to be understood.
This principal of changing the pitch at one point on the rotor disc is known as cyclic pitch. Changing the pitch over the whole disc to make the model rise or descend is known as collective pitch.
From this it can be seen that a collective pitch model helicopter has 5 control functions. These are:
1) Fore/aft cyclic pitch (also known as 'elevator'), which controls forward or rearward movement.
2) Lateral cyclic pitch (also known as 'aileron'), which controls sideways movement.
3) Tail rotor pitch (also known as 'rudder'), which controls left or right turns.
4) Throttle, which controls engine speed.
5) Collective pitch (usually referred to as just 'pitch'), which controls vertical movement.
Cyclic pitch inputs are transferred from the radio servos to the main blades via a 'swashplate'. This is simply a large ballrace bearing which is mounted on the main rotor shaft. The servos are connected to the outer section of the ballrace, which remains stationary. Connections to the rotor blades are made from the inner section of the bearing, which rotates with the shaft. There are almost as many variations of the linkages used (fixed and rotating) as there are makes of helicopter. In most systems, the swashplate tilts in the direction that the model is desired to move - although, here again, there are variations.
Collective pitch inputs can be made by some separate system (via a hollow mainshaft or external rods), or by raising and lowering the swashplate. This latter system is generally known as CCPM (for Cyclic/Collective Pitch Mixing), and can be done mechanically, electronically (usually in the radio transmitter), or by a mixture of the two.
Helicopter motors are much more heavily stressed than motors used in fixed wing aircraft. Cooling can cause problems and a purpose-made helicopter engine will usually incorporate some form of 'heatsink' cylinder head. This means that there will be considerably more cooling area to dissipate the heat.
In some cases the actual inlet and exhaust timing may be different to give added flexibility. Some manufacturers also fit different carburettors aimed at giving better control of the mid-range mixture setting. Further variations include special crankshafts to suit specific models and 'pull-start' options.
A subject which still causes confusion for those just starting in helicopters is that of 'Helicopter' radios versus standard, or 'Aero', radios. With a collective pitch machine and a standard radio, you can compromise by working the pitch from a fifth servo which is operated, via a 'Y' lead, from the throttle channel, along with the existing throttle servo. This will simplify the setting up process and do everything that you want until you are well advanced into the process of learning to fly.
The main difference between a helicopter radio and a standard set is that instead of the 'throttle' stick controlling just one channel, it now controls two ('throttle' and 'collective pitch'). Obviously, this is not an ideal arrangement in some situations, so even the most basic set will also have a 'throttle hold switch' and an 'idle-up switch'.
A throttle hold switch does exactly what its name implies. It holds the throttle at a preset point while leaving the throttle stick still in command of the pitch channel. The preset point can be anywhere on the full throttle range, but will normally be set to give a safe idle speed. This is mainly intended for practising the autorotation manoeuvre, but can be used to observe the operation of the pitch servo without the need to stop the engine. It also serves as a useful safety device for carrying the model with the engine running.
An idle-up switch allows the lower limit of the throttle range to be raised so that pulling the throttle stick right back will not reduce the engine speed to the idle level. The main purpose of this is to enable the pitch to be reduced to zero, or a negative figure, during aerobatics without losing engine power.
As you become more proficient and find more things to do with your model it will become obvious that a simple idle-up switch alone leaves much to be desired if it does not also allow the pitch range to be changed. With two pitch ranges available, one of which must be used for starting up, you will soon find that compromises are necessary in setting up the second range to do the various things that you want. Another complication which we have to consider here is that if an ATS system (see below) is in use, this will be upset by changing the pitch range. Most experienced fliers turn the ATS system off when performing aerobatics, the alternative being still more transmitter complication. So, your two position idle-up switch now needs to be a multi-position 'flight mode switch'.
These two features provide the main difference between a basic helicopter set and a basic aero set with 5 servos and a 'Y' lead. Neither of them is essential during the learning stage.
One other feature of a basic helicopter set is some means of mixing a portion of the collective pitch signal into the tail rotor command so that there is some automatic compensation for changes of torque. Such systems have become generally known as ATS - although there are other names in use. Normally, there will be two separate adjustments, to compensate for torque variations when the model is rising or descending, usually referred to as 'up mix' and 'down mix'. There will also be a switch to set the system to suit clockwise or anticlockwise rotation of the main rotors.
These three features ('hold', 'idle up' and 'ATS') form the basics of a helicopter radio in its simplest form. On the latest types of helicopter radios, all three of these features will be much more complex and there will be numerous other features aimed at refining the performance of your model and making it both easier to fly and able to perform more complex manoeuvres.
While most of these adjustments can be performed using switches and knobs, more and more equipment is becoming computerised in one way or another, and will incorporate more and more features aimed at adjusting the model to suit the specialised flyer, together with several model 'memories'.
For helicopter use the normal receiver battery supplied with the radio equipment will give a very restricted amount of flying due to the high current drain produced by the use of 5 servos and a gyro (see below). For this reason, it is advisable to fit a larger battery having a capacity of 1000 or 1200 mAh rating.
The control input which requires most attention on a model helicopter is the tail rotor pitch control which has to perform the dual function of preventing the model from rotating in the opposite direction to the main rotor and steering the model like a rudder when required. The first function can be made largely automatic by fitting some form of gyrostabiliser, or 'gyro'. The name comes from the fact that most types use a spinning flywheel - although solid state versions are now available.
When fitted between the radio receiver and the tail rotor pitch servo, the 'gyro' will automatically compensate for any unintentional movement of the tail without interfering with any intentional control inputs. Most types have two sensitivity, or 'gain', settings which can be selected from the radio transmitter via an additional channel.
It is possible to fly a model helicopter without a gyro, but they considerably ease the process of learning to fly and reduce the workload of the experienced pilot. For competition purposes, they are essential.
There is far more to be purchased than just a helicopter, motor, radio and gyro. Some of the following items are not absolutely essential - but they will make life much easier. Where possible, a more basic option is also given.
Glowplug battery
The vast majority of model helicopters are powered by 'Glowplug' motors. These require a battery to be connected to the glowplug to energise it when starting the motor. When the motor is running, the battery is disconnected. Most glowplugs use a 1.5 volt supply. This is a result of the fact that the glowplug was developed in the USA where large capacity dry cells ('bell batteries') were, and still are, easily obtainable. These cells are available in the UK, but not easily. In the UK, 2 volt glowplugs are also readily available.
This leads to a rather curious situation where 'plugs are available in 1.5 and 2 volt ratings, while the most available batteries are nominally either 1.2 volts (nickel cadmium) or 2.4 volts (sealed lead acid).
There are three possible solutions here:
1) Use a fully charged single nickel cadmium battery (1.35 volts) with very short leads and a 1.5 volt 'plug.
2) Use a sealed lead acid battery with a suitable dropper for 1.5 or 2 volt 'plugs. Settle on one type only or devise some means to make sure that the 2 volt dropper cannot be used with a 1.5 volt plug.
3) Use an even larger dropper, or suitable circuitry to drive the 'plug from the 12 volt starter battery (see later). Use the same caution as in 2, above.
Several specialist suppliers produce a device as in type 1, above, based on a single nickel cadmium battery with an integral glowplug clip. These frequently include a suitable dropper resister with lead and plug to charge from your car cigar lighter socket.
Type 3 can be found as a part of a device called a 'power panel'. See later.
Electric starter and battery
In the vast majority of cases, the only practical way to start the engine in a model helicopter is by using an electric starter. This will be fitted with a metal cup holding a rubber insert, which engages with a cone fitted to the engines crankshaft via the fan or clutch. The same metal cup also has a pulley which caters for those machines which utilise a belt drive to a pulley on the fan for starting. In these cases, the belt cannot be removed from the model and must be stowed safely away on the model after starting. It is possible to start this type of model by using a cord wrapped around the starting pulley. Some model/motor combinations are now available with a recoil pull-start system.
Starter motors need a separate 12 volt battery of fairly large capacity to drive them. Typically, this will be a motorcycle battery (wet cell) or a sealed lead acid battery (gel cell) of 6 to 10 amperehour capacity. This will require its own charger, which can usually be obtained from the same source as the battery.
Wet cell batteries can be charged from a car battery charger provided the current is restricted to some suitable value (1 to 2 amps). Sealed batteries require more specialised charging at a regulated voltage. The easiest way to do this is to obtain a mains driven bench power supply for a Citizens Band radio receiver (CB). This will have a regulated output of 13.8 volts which is ideal. A 1 ohm resister (10 watt rating) in series will restrict the current to a suitable value.
If an electric helicopter is being operated, this same battery can be used for charging purposes, but a higher capacity is desirable. If weight is no limitation, a cheap automobile battery is better still and can be used for all purposes.
Fuel and filling device
In the UK, glowplug fuel is sold in plastic bottles. In the US, it is often sold in metal cans. Please be advised that a metal can full of fuel and a 12 volt battery can combine to make a very good bomb. BE CAREFUL!
The serious helicopter flyer will use a lot of fuel and there are many ways in which the fuel can be transferred from a bottle or can to the models fuel tank. The simplest, but rather messy, method is to use a plastic, washing up liquid, bottle equipped with a suitable nozzle and a length of rubber tubing as a combined fuel can and filling pump. This is known as a 'squeeze bottle' - guess why! Fuel can be transferred from the original container by squeezing the bottle and then then sucking it out or by the use of a suitable funnel.
More elegant and efficient systems use some kind of pump to transfer the fuel directly from the original container to the tank. Pumps are available in both manual (hand cranked) and electric powered types. Electric pumps may contain their own dry battery power source or may be powered from the starter battery. Some suppliers manufacture a 'fuel station' which consists of a container with an integral manual pump.
Power panels
All of the above devices can be combined into one device known as a 'power panel'. This uses one 12 volt battery to drive the starter battery, an electric pump and to energise the glow plug. In some designs, the glowplug outlet may be switched between 1.5 and 2 volts, while others give an adjustable output.
Other variations give a simple dropping resister to reduce the voltage for the glowplug or sophisticated electronic circuits which sense the glowplug state and adjust things accordingly.
How do you carry it all?
The methods of transporting the support equipment around the field are almost as numerous as the number of helicopter fliers. They range from cheap plastic trays to complex custom built devices on wheels. There are a range of commercial boxes (or 'caddies') available in kit, or ready built, form. The handier modeller will make his own - and probably change the design several times.
Chargers
It should be obvious by this stage that battery chargers are becoming a major part of the equipment. The charger for the radio equipment should have been supplied along with it, but it will have been intended for the standard receiver battery. If a battery with a larger capacity has been used (this is essential for helicopter use), the standard charger will probably take a long time to charge it fully. Chargers are now needed for the following:
Larger receiver battery.
Glowplug energiser.
Electric starter.
There is a large specialist market based on various chargers for all of the above purposes. These are available for both mains electricity and 12 volt power sources.
An electric helicopter will require another charger for the drive battery. This will normally be powered from a 12 volt battery which will be basically the same as the electric starter battery as previously mentioned. This charger may be a simple device using a dropper resistor and a clockwork timer, but for best results, a sophisticated electronic device which cuts off automatically when the battery is correctly charged is recommended. Many of these incorporate a booster device which converts the 12 volt input to a higher voltage for more efficient charging.
Summary
A large amount of support equipment is needed to operate the average model helicopter. Like the helicopters themselves, this ranges from cheap and simple to complex and expensive. While you can operate with no more than a piece of cord, a plastic bottle and a glowplug energiser, you probably won't enjoy it very much.
The average modern helicopter model can be assembled with little more than two or three sizes of allen screw driver, or wrench, and some threadlocking fluid, and many kits include these. Much the same applies to balancing the revolving parts and the instructions will usually give details of a simple method of doing this.
However, the dedicated model helicopter flyer will soon find that other items are necessary - perhaps right up to model engineering standards. Some form of precision balancer will soon become necessary and there are many different types available. Machines which include some form of remote cone start may well need the use of a dial gauge for correct alignment. In no time at all you may find that the tools and equipment that you require (and acquire) far outnumber the support equipment.
A training aid is some device which serves the dual purpose of making the model easier to fly and minimising the damage in the event of a heavy landing.
The simplest device is two crossed lengths of wooden dowel attached to the undercarriage. This gives a great deal of extra information to the pilot regarding the models attitude and cushions a landing which is made when the model is not perfectly level.
This can be carried a stage further by fitting plastic balls to the ends of the dowels (GRP is even better than wood for the dowels). These are arranged to rotate freely and allow the model to be moved around on a smooth surface without actually leaving the ground. Where the model is flown mainly from grass, the balls can be replaced with a plastic ring ('hoola hoop').
Another common method is to fit the model with inflated plastic floats. These give similar advantages and are better suited to grass surfaces. They also tend to make the model less sensitive and more stable and help to absorb a hard impact.
There are also various types of training stand which limit the movement of the model while allowing it to be 'flown' around. The better types allow just one control function to be mastered at a time. They tend to be expensive and serve no purpose when full control has been mastered.
Simulators
It is fairly easy to produce a simulator which gives a fair idea of the response of a model helicopter. A piece of glass, or an old mirror, can be utilised with some scrap pieces of timber and part of your radio equipment to produce an 'orientation simulator'. It can be a useful aid in learning how to hold and operate the transmitter and is also an indicator of servo performance.
There are an increasing number of computer simulators available and they are getting better all the time. Their usefulness is unproven, but for the complete novice they give an accurate impression of what is involved. The experienced flier tends to find them rather too 'easy' to be useful - but try getting it away from him!
Expert help
This is by far the best training aid. A badly set-up model helicopter can be impossible to fly. Having the model correctly adjusted and actually having seen it fly, and knowing that it can be done, helps immeasurably. It is possible to set-up the model so that it is easier for a beginner to fly - but the beginner himself is the last person who is capable of doing this!
There are two real stages to learning to fly a model helicopter:
a) Learning to hover.
b) Learning to get back into the hover.
A capable fixed wing pilot can fly a helicopter around the sky quite well, in spite of different handling characteristics and a degree of interaction between all of the controls. However, it is extremely unlikely that he will be able to stop it from moving forward (or in any other direction!). If he does succeed, the model will immediately start to pirouette (even with a good gyro fitted). All of which means that he will not be able to land it in one piece (well, not more than once anyway).
Let's be honest here and state that there is not really much that the written word can do to help with what is usually a very traumatic experience. The plain truth is that you are on your own until you have mastered the basic hurdle, and all you need is persistence. Anyone can do it - but it helps a lot to know that the model is correctly set up and will fly, by seeing someone else fly it.
Choose a day with a nice steady breeze - not a flat calm - and face the model into it (it is a good idea to start the engine first). Stand behind the model and off to one side a little. Check that there is lots of free space around you and slowly open the throttle. As the model becomes light on its skids/sticks/floats it will probably try to turn around. Note which way it is turning and close the throttle smoothly.
Smoothly is very important. Any sudden closing of the throttle on a collective pitch machine will invite a collision between the main rotor blades and the tailboom. This is one lesson you will learn very rapidly. One thing that can help here is to use the idle-up switch (described earlier) to set the model up so that it will only descend fairly slowly if you panic and close the throttle suddenly. The problem here is that you must remember to switch off this feature when starting up and handling the model.
Adjust the tail trim to correct the turning tendency and try again. Keep at this until the tail stays reasonably straight. Face up to the fact now that the tail trim will always be a compromise and will keep changing. In the early stages, this can be a major problem. Careful trimming and a good gyro can do a lot to help here.
Having got the tail under control, more power can be added until the machine is almost airborne. This is known as a 'zero height hover' and the model can be steered around on the ground while you get used to its response. At this point, the model will show a marked tendency to move sideways. This will be to the right with clockwise rotors and to the left with anticlockwise rotors. This can be strong enough to appear as a tendency to roll over. Some sideways cyclic trim should be added to oppose this. Here again, some compromise is necessary, since the effect is less marked when the model leaves the ground.
Most people find that the model is easiest to control when it is moving forwards, since it responds like a car. This usually leads to a situation where the model moves slowly up wind and eventually has to be dragged back and the whole process repeated - mind those blades!
All of your early hovering attempts will be made with the model in front of you and the tail pointing more or less towards you. When you have mastered the hover this will become a "safe base" to return to when you get into difficulties. There is some danger of this position becoming the only way that you can fly the model, with other positions or attitudes becoming increasingly difficult. While you are at the stage where the model is being slid around in contact with the ground, perhaps accompanied by the odd short hop, it is advisable to try manoeuvring the model round in turns, both left and right, and also positioning the model with its nose towards you. This will pay dividends later.
After a few sessions of steering the model around on the ground in a "zero height hover" you will reach the stage where the power can be increased in short bursts to lift the model clear of the ground for short periods. One advantage of this approach is that you become accustomed to the throttle setting which will allow the model to settle gently back to the ground rather than falling rapidly.
This soon becomes a series of forward hops, with the hops getting longer and longer - then suddenly you're flying it, but still moving forwards. Now burn several gallons of fuel until it becomes second nature.
With increasing confidence you should reach the point where the model can be kept in the air for lengthy periods with it moving slowly forwards and you following it. At this stage, don't be tempted to try to turn the model as this will inevitably lead you into a difficult situation which you will not be able to cope with.
The next hurdle is to stop moving forwards and keep the model stationary over one spot. Having got used to moving forwards, this can produce problems in knowing whether you are moving or not. Some form of marker on the ground is a great help here. This can be a patch of grass or bare earth, a stone, a car mat, etc. but do ensure that it is not large enough to cause problems if the model should touch it.
Stopping the model moving forwards can also be problematical. Obviously, you pull the cyclic stick back to lower the tail and impart a rearwards force to stop the forwards movement. Unfortunately, early efforts are likely to lead to the model charging backwards towards the pilot followed by a large application of forward stick causing an uncontrollable build up of forward speed. The answer is to ensure that the model does not build up too much speed in the first place - easy to say, but difficult to do.
This is exactly the same process as getting from forward flight back into the hover and many people find this just as difficult as learning to hover. If the speed is high, it will take a considerable distance or some dramatic manoeuvre to reduce it - and you are not ready for dramatic manoeuvres at this point. One possibility is to learn to fly around yourself in the hover and use this to extend the distance available for slowing the model down. This is not going to make you very popular on a crowded field, however.
Setting the trim
This is something which can cause some difficulty for the inexperienced flyer and experienced help is invaluable. A well trimmed model is much easier to fly and it is difficult for the beginner to trim a model without help.
When steering the model around on the ground, in the zero height hover, it will soon be obvious if the model has a pronounced tendency to keep heading in one direction or turning one way and it is a simple matter to use the transmitter trim controls to correct this. Unfortunately, this trim correction may not be correct when the model leaves the ground. The solution here is to perform very short hops and observe the behaviour of the model. If the model repeatedly moves to the right, then left cyclic trim is needed and vice versa. If the model insists on moving forwards, then rear cyclic trim is needed, etc.
Tail rotor trim is variable and depends on many factors. At best this will always be a compromise - which explains why this is one of the most difficult aspects of learning to fly.
Model helicopters are dangerous and must be treated with respect at all times.
When starting the motor, ensure that you have a secure grip on the rotor head. Many motors require the throttle to be partly opened to ensure starting and even the best clutch will drag to some extent under these conditions. Once the rotors start to revolve, you are in trouble - so don't let them start.
Lets assume that you have made some mistake in your start-up procedure, like not switching on the radio, or having 'idle-up' switched on, etc. causing the motor to run at well above idle speed. You cannot afford to let go of the rotor head. You must hang on grimly while finding some way to stop the motor, or slow it to idle. Letting go means almost certain injury.
If the motor has stopped and the main rotor blades are spinning under their own inertia, they can still inflict considerable damage. Most people stop the blades in this situation by placing the flat of their hand on top of the rotor head and pushing down - some models incorporate a 'head button' to facilitate this. It would be pointless to advise against this practice, but be careful. A broken finger is a real possibility! Also make sure that your legs are well clear of the rotor disk.
If you get into trouble in the air, don't resort to the established fixed wing procedure of closing the throttle, which will cause the model to plummet to the ground. You must reduce the power just enough to give a controlled descent. Unfortunately, the correct setting depends on forward speed, wind strength and direction, etc. This means that some experience is needed before you get into this situation. Another tendency with experienced aircraft flyers after getting into trouble in the hover situation is to add power and go off into forward flight, with inevitable results. The moral here is "Don't try to run before you can walk"!
Do
Seek experienced help - preferably before beginning construction of your model,
Buy from a specialist shop which offers a setting-up service and, if possible, flying tuition.
Use a tail gyro.
Start with a non-scale pod-and-boom type.
Remember that a model helicopter is dangerous and treat it with respect.
Realise that uninformed spectators may not be aware of the models capacity for injury and proceed accordingly.
If you must 'go-it-alone', read everything that you can obtain on the subject first.
Fly with care.
Don't
Fly without adequate insurance.
Take risks involving other people or their property.
Repair broken rotor blades.
Try to salvage and reuse damaged components which you are not absolutely sure of.
Use weighted blades until you are sure that you need them.
Try to walk before you can crawl, run before you can walk, etc.
Welcome to a fascinating branch of the hobby.

![]()
![]()
![]()
![]()
![]()
![]()
![]()