With limited resources (a state pension) I decided some time back that I didn't need brushless motors. I was getting quite good performance using my stock of brushed motors. Things had adanced a little when I was forceably (more or less) introduced to Lithium-Poly batteries.
I bought an Ikarus 'Shock Flyer' mainly to find out why they flew better than all of my existing models. This went quite well using a GWS IPSD unit and Li-Poly's. It would prop hang for a limited period and gave good aerobatic performance for 10 - 20 minutes depending on the battery.
Then the motor unit flew off in the air and refused to be found! Maybe I should just have bought another unit. However, I had seen the C&K kit motor performing at a local indoor flying session and decided that I should try one. I found their website Brushless Motors and ordered a standard '2C-20-310' motor straight away. Obviously, the Post Office was having a good day because the kit arrived next morning.
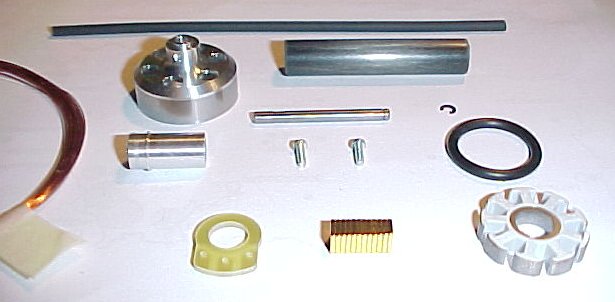
The parts of the kit are shown above, including a PCB connector plate (lower left centre) which is a recent addition not shown in the instructions. The instructions themselves are comprehensive and lead you through the assembly with pictures of each stage.
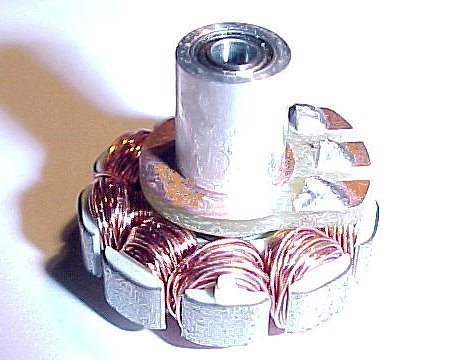
Winding the stator is not difficult, but you probably need to do 2 or 3 before you will be satisfied. I managed it first time but had to rewind one pole because I lost count. Basically, you number the poles 1 to 9 and then commence winding at number 1, followed by 4 and 7. You then twist the wire to make a tap and proceed to 2,7 and 8, make another tap and then wind 3, 6 and 9. Finally, you twist the beginning and end together to make the third tap. Each pole has 32 turns and things get very tight towards the end!
The tendency here is to wind in layers. You will get 11 or 12 turns into the first layer but, if you wind back to the centre and out again, you will end up on the outside of the pole and you need to finish at the inside. The first three poles will be easy, the second three a little tight and the final three very difficult! You need to load the majority of the turns towards the outside of the pole as things rapidly get very crowded slose to the centre. I wouldn't swear that I got 32 turns on each pole! I will rewind it sometime in the future to see if I can make it neater.
The kit included a PCB to terminate the connections. This isn't mentioned in the instructions, but it's use is obvious. It slides on the rear of the stator, the three taps go through the holes and are soldered in place. The result is snug and no further fixing is needed. This makes it easy to try again later.
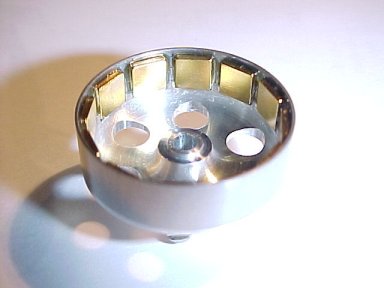
There are twelve magnets that have to be glued into the rotor. The instructions advise that you set them in a line on the bench to get the right orientation of north and south poles. It dawned on me later that this still gives two possible arrangements, with no indication of which is correct.
I tacked the magnets in with slow epoxy (1 hour) and then added more epoxy later to fill in the gaps and make a more secure joint as advised. This is probably unnecessary as the magnets attach them selves to the outer steel ring and are held in by centrifugal force anyway.
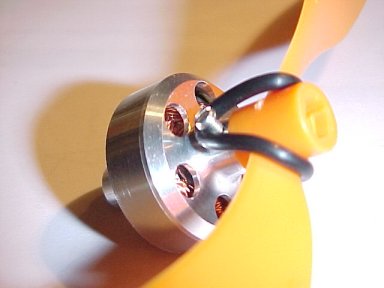
The instructions include details of how to identify and remove any high spots that impeed rotation but I didn't have any of those. The motor span very freely but with a notching action as the poles went past the magnets. All-up weight was 20g as advertised.
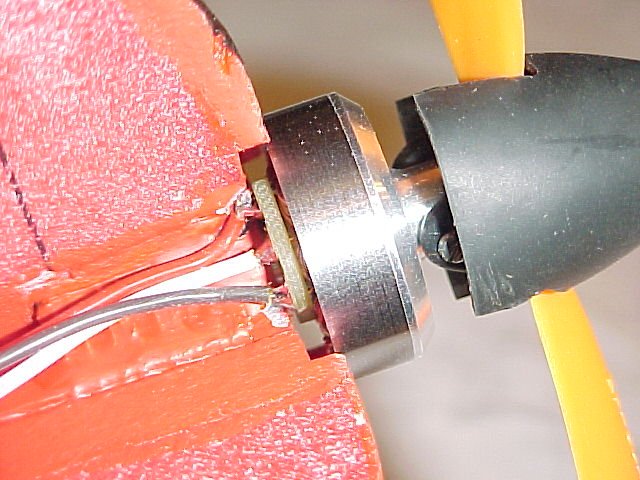
The motor is mounted via a piece of carbon tube which is a snug fit on the rear of the motor. There is enough tube to make two mounts, which is thoughtful. The tube crushes very easily and I would advise winding some thread around it to reinforce. This will also make it easier to glue in place. The motor is retained in the tube, once fitted, by a small amount of contact adhesive (Evo-Stik, etc) which can easily be removed with cellulose thineers - keep this well clear of foam, however.
The default settings were OK for a start and the only thing that needed changing was the BEC cut-off voltage, which needed to be 6 volts for 2 Li-Poly batteries. There was some initial confusion, because the manual makes no mention of the controller beeping at the same time as it flashes the LED and it states that the LED will flash rapidly to confirm each acceptance of your command. It doesn't (well mine doesn't) - it flashes repeatedly, but quite slowly, and beeps at the same time.
The problem at this point was that the motor is so light that the CG was way too far back. I had to relocate the battery to the side of the fuselage in front of the U/C and move the receiver from the rear to a point under the wing previously occupied by the battery. All-up weight was now 160g with two 340mAh Kokam Li-polys - 14g (1/2 ounce) lighter. See the Shock Flyer page for more info.
The kit
Assembly
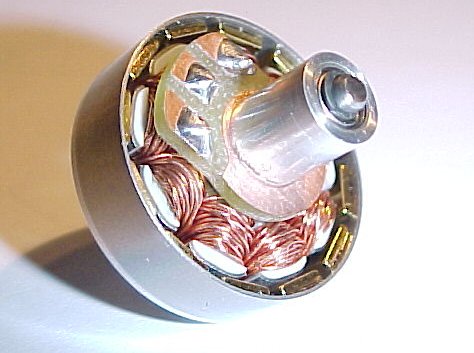
There is very little to this. You glue the centre piece into stator, wind the stator and glue the magnets into the rotor.You then assemble the rotor to the shaft with two screws which become the prop saver. The shaft is retained at the rear by an 'E' clip. The prop is attached by a rubber 'O' ring.
The controller
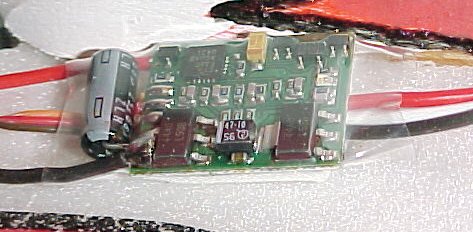
I emailed C&K for their advice on this. They suggested either a Jeti 8 amp or a Castle Creations 'Phoenix 10'. I couldn't source a Jeti (they were expensive too) so ordered a Phoenix 10 from the US. This unit has the advantage of being fully programmable and the features include two governed modes for helis. The programming is done by using the transmitter throttle function as a switch. After entering the program mode, the unit goes through the possible functions sequentially - indicated by coded flashing of an LED - and you select 'Yes' by full throttle and 'No' by low throttle. You can download a manual here (PDF format)..
Installation
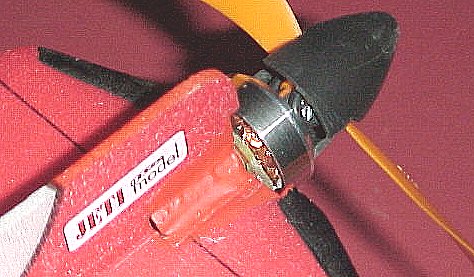
This was very easy and straightforward. I cut away some of the existing motor stick that I had fitted to take the GWS unit and cyanoed a piece of the mounting tube in place. This was reinforced by wrapping thread around the assembly and finishing off with some fillets of slow setting epoxy. A small amount of Evo-Stik retained the motor in place.